My microphone isn't working!
User Self Diagnosis Guide
Bandaid Fix
This is a very simple and almost guarantee solution, but does not fix the original issue. This is helpful if you are using an Mic Array or a unsupported microphone.
Method 1
- Install Voicemod.
- Virtual Audio Cable works as well, but require more steps to setup.
- Open Voicemod & follow the setup instructions, select your microphone as the input device.
- In SCP:SL navigate to Settings -> Audio -> Voice Chat Device and select the Voicemod Virtual Audio Device.
Method 2
1. Right click SCP:SL in Steam and click properties.
3. Click the "Browse Local Files" button
4. Run the file named "mono" or "mono.msi" if you have file extensions turned on. (Do not run monoinstall.vdf)
5. Go through the mono install wizard and when it's finished restart your PC.
User Checklist
Use the following guide as a checklist for common causes & solutions
- Make sure your voice chat input device is set to your proper microphone in SCP:SL Settings -> Audio
- If you do not see your microphone as an option in game please follow below;
- Press
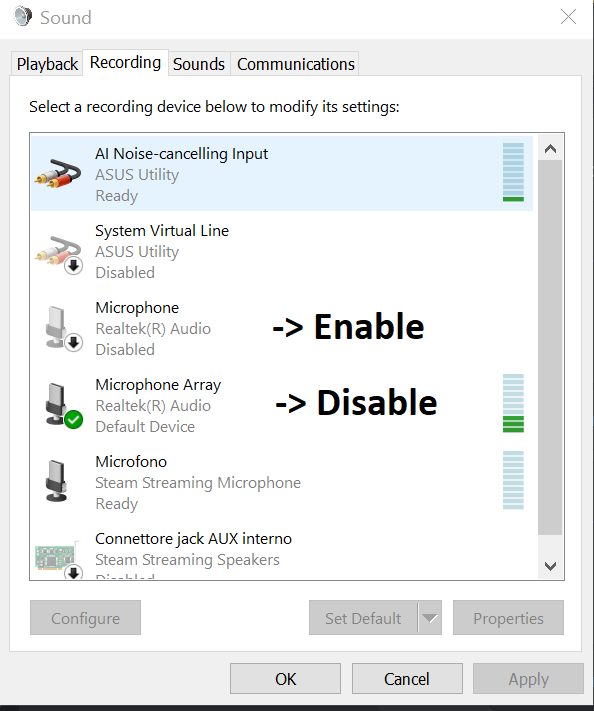
Windowskey +Rand entercontrol mmsys.cpl sounds->clickEnter⏎. - Navigate to the Recording tab, find your microphone and make sure its not disabled.
- Press
- Exclusive Mode could be taking control over your microphone, please follow the steps below;
- Press
Windowskey +Rand entercontrol mmsys.cpl sounds->clickEnter⏎. - Navigate to the Recording tab, find your microphone -> right click -> properties
- Open the Advanced tab and toggle "Allow applications to talk exclusive control of this device" off.
- Press
- Another cause can be your microphones sample rate, please follow the steps below;
- Make sure any applications that are using your microphone are closed, otherwise you will not be able to change the sample rate.
- Press
Windowskey +Rand entercontrol mmsys.cpl sounds->clickEnter⏎. - Navigate to the Recording tab, find your microphone -> right click -> properties
- Open the Advanced tab and change Default Format to "48000 Hz"
- Make sure any applications that are using your microphone are closed, otherwise you will not be able to change the sample rate.
Playerlog Diagnosis
Please check your playerlog for anything containing these keywords (CTRL + F), for example:
"Error initializing output device"/"Microphone failed to start recording"
Solution
Steps to Uninstall Microphone & Headset Audio Devices
- Open Device Manager
- Press
Win + Xand select Device Manager from the menu. - Alternatively, press
Win + R, typedevmgmt.msc, and press Enter.
- Press
- Go to the top of device manager and under the view tab click "Show Hidden Devices"
- Locate Audio Devices
- Expand "Audio inputs and outputs".
- Expand "Sound, video and game controllers".
- Uninstall Relevant Devices for Microphone/Headset:
- Right-click each entry related to the headset or microphone (e.g., "Headset Microphone," "Headphones (USB Audio Device)").
- Select Uninstall device.
- If prompted, check "Attempt to remove the driver for this device" and click Uninstall.
- Ignore system audio devices (e.g., "Speakers (Realtek Audio)") unless they are confirmed to be part of the issue.
-
Ensure Bluetooth is disabled.
How to disable Bluetooth (Windows 10/11):
-
Settings: Press Win + I → Bluetooth & devices → toggle Bluetooth Off.
-
Quick toggle: Press Win + A → click the Bluetooth icon to turn it Off.
-
If the toggle won’t stay off: Win + X → Device Manager → expand Bluetooth → right-click your adapter (Intel/Realtek Bluetooth) → Disable device → restart PC.
-
- Restart the PC
- Restart the computer to allow Windows to reinstall the drivers automatically.
After reboot
- Set Default Audio Devices
- Right-click the speaker icon in the taskbar and select Open Sound settings.
- Under Output and Input, select the correct headset/microphone as the default device.
- Disable Exclusive Control
- In Sound settings, click More sound settings (right pane).
- Go to the Recording tab, select the microphone, and click Properties.
- Navigate to the Advanced tab and uncheck:
- "Allow applications to take exclusive control of this device"
- Configure Steam Audio Settings
-
Open Steam > Settings > Voice.
-
Under Voice input device, select the correct microphone.
-
Under Voice output device, select the correct headset/speakers.
-
Set Voice Transmission type to Open Microphone
- Set Voice Transmission Threshold to Off
- Disable Automatic volume/gain control under advanced settings
-
"Unsupported file or audio format"
Experimental Fix: AMD Processor
Requirements: AMD CPU (Ryzen 6000+ Series with integrated graphics) and/or GPU (AMD Radeon RX 6000 Series desktop graphics and newer)
Experimental Fix: NVIDIA RTX GPU
Requirements: NVIDIA GeForce RTX™ 2060, Quadro RTX™ 3000, TITAN RTX™, or higher


No comments to display
No comments to display