3. Remote Admin Config Setup
Remote Admin configs are server config files that define ranks and who they are given to. These documents are extremely sensitive and any mistake can cause certain parts of the game to misbehave. If you’re ever in a situation where certain parts of your config don’t seem to work properly, generating a fresh config is always an option. As a note, before starting, be sure that you don’t accidentally try and edit the old remote admin config template, still found on windows builds for LocalAdmin!
Config Paths
- Windows:
AppData\Roaming\SCP Secret Laboratory\config\<port>\config_remoteadmin.txt- You can press Windows button + R and enter
AppData\Roaming\SCP Secret Laboratory\config, This will directly take you to the config folder.
- You can press Windows button + R and enter
- Linux:
.config/SCP Secret Laboratory/config/<port>/config_remoteadmin.txtunder the user you are running LocalAdmin in.
Assigning members to roles
Lets begin with the topmost section of the RA config, the role assignment section.

The topmost section of the remote admin config assigns specific roles you’ve created to members.
The general format is:
- 76561198801452050@steam: owner Take note of the space before and after the dash. Beyond that, the entry is comprised of a steam 64 ID, followed by "@steam:", a space, and then the defined name of the role (in this case "owner").
This line also supports Discord auth'ed user IDs (if using -fdiscord), and a NWID. Simply replace the text (numbers in the case above) beyond the dash with your Discord user ID for Discord auth, for NW users replace it with your requested NWID, then replace "@steam" with "@discord" for Discord, or "@northwood" if a studio member. Examples are below if needed:
Discord:
- 2141379914474455080@discord: owner NWID:
- username@northwood: owner One of the most common problems within Remote Admin config occurs when roles do not get assigned. This is typically caused by the existence of placeholder IDs, which are designed to show you how to format the config file. You need to remove any placeholder IDs for the config file to function.
Role properties
Let’s continue to the next section of the document, which defines the properties of the roles you create. In the example below we will use the owner group as reference:
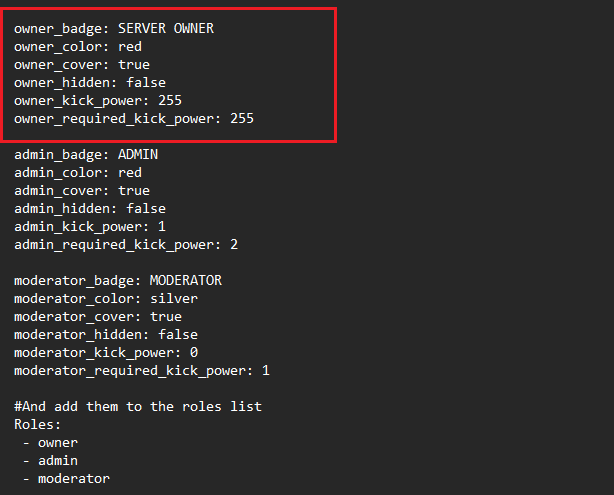
| Config option | Description | Default value |
| owner_badge | This is a string of text that will appear in-game, as it does here. Certain special characters may create problems with a badge, causing it to not show up in-game | SERVER OWNER |
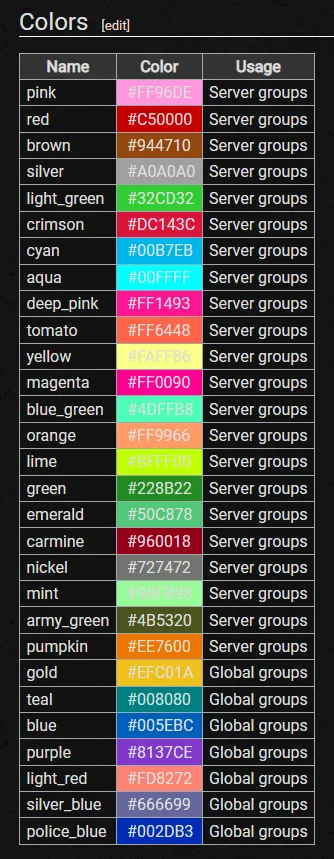
| owner_color | must be picked from a pre-defined list of colours. The list can be found below. Only colours marked as "server groups" can be used | red |
| owner_cover | sets whether the server badge will override global badges | true |
| owner_hidden | sets whether the badge will be hidden by default | false |
| owner_kick_power | How much kick power this rank has | 255 |
| owner_required_kick_power | How much kick power is needed to kick this rank | 255 |
Below are all the available colors.
You cannot use global group colors!
Role creation
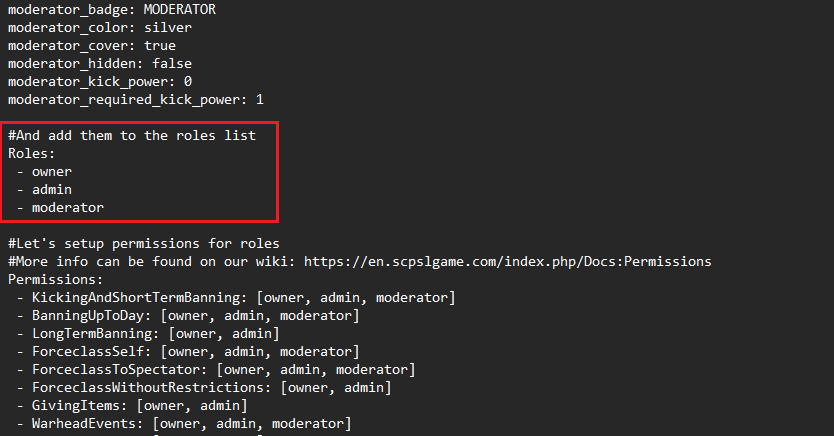
Each role needs to be added to the “Role List”, in order for it to be readable by the config file.
Permission Nodes
This next section tends to get a bit messy, but the basic structure is quite simple. The Role Permissions section of the Remote Admin document defines what Remote Admin permissions each role has access to. For a complete list of all permission nodes, and how they work, see here.
- Permission nodes are notoriously sensitive and the exact format needs to be be followed.
- AdminChat: [owner, sos, management, doa, headadmin, ethics, admin]Once more it is crucial to note that the dash has a space before and after it. As well, there is a space after the permission node name (in this case, AdminChat: ). Finally, each role that is defined as having a permission node is followed by a comma, and then a space. This spacing and formatting is really sensitive on this part, and missing a comma or space can break entire roles.
Misc options
| Config value | Description | Default value |
| allow_central_server_commands_as_ServerConsoleCommands | Allows running central server commands (they are prefixed with "!") using "sudo"/"cron" command in RA (requires ServerConsoleCommands permission). Don't turn on unless you fully trust all people with this permission, they need to run the commands from RA and you know what you are doing. |
false |
| enable_predefined_ban_templates | Should the GUI-Based RA use the predefined ban templates | true |
Predefined ban templates
Here you can define ban templates for your staff members to use in-game. This can always be overriden by choosing the "Custom" ban tab.
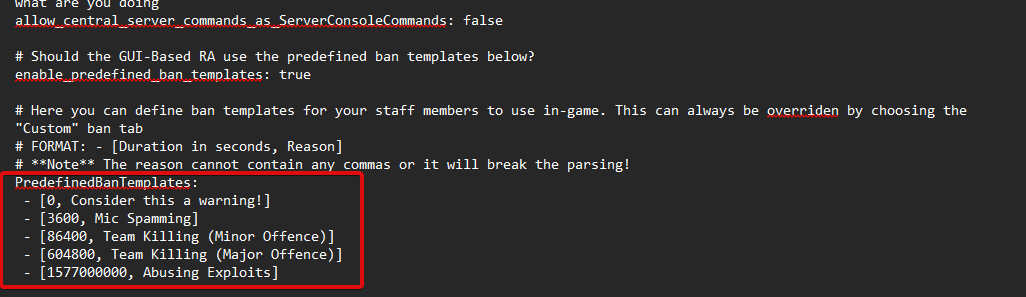
The format for creating ban templates goes as follows :-
- [SECONDS, Text]
Take note of the space, dash, space at the beginning.
You cannot have any commas in the reason or it will break the parsing.
No comments to display
No comments to display